Up-to-date with version 3.0.5999
MusicBee provides several tools that use web services to automatically tag your files. Except where noted, all tags are drawn from the services configured in Tags (2) Preferences.
Auto-Tag by Album[]
Auto-Tag by Album
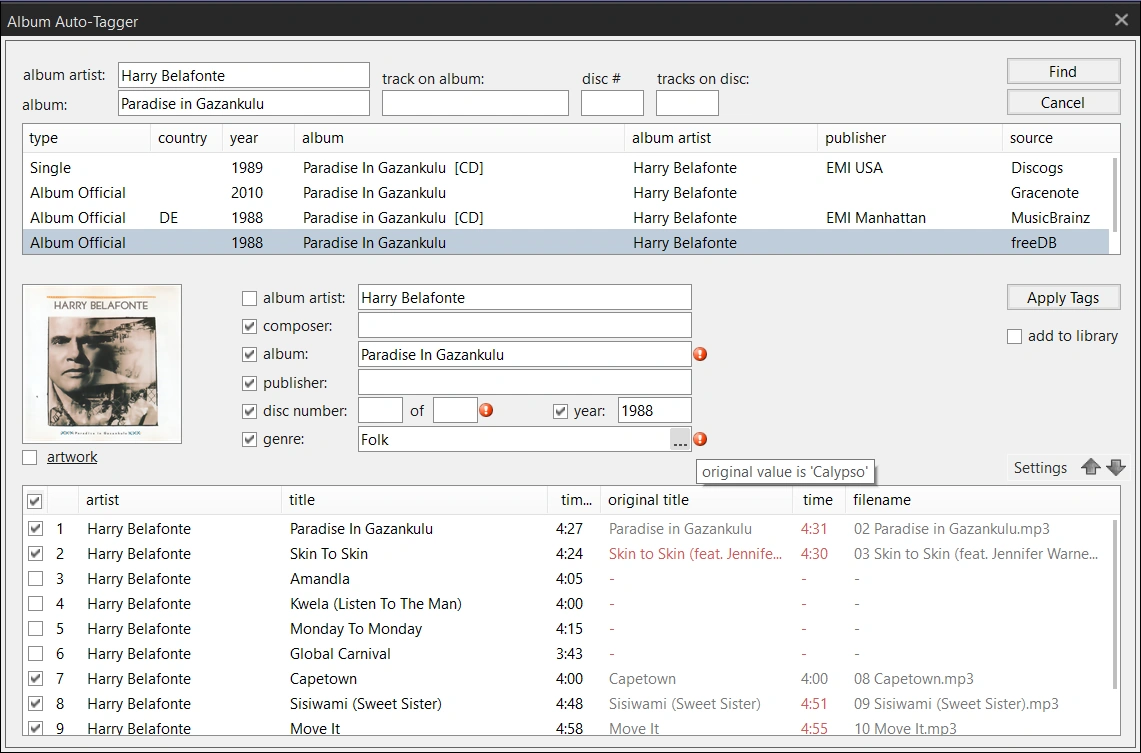
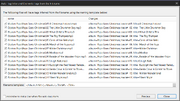
To open the Auto-Tag by Album screen, select one or more tracks from a single album and either right click to use the context menu or use the hotkey Ctrl+Shift+T. The tagging window will open and automatically search for a matching album. If you're not happy with the results, you can adjust any of the search fields at the top of the window (Album Artist, Album, Track on Album, Disc #, and [Total] Tracks on Disc) and redo the search with the Find button.
The list of albums found by the search appears just below the search fields. You can select any result to load it into the bottom part of the window, where MusicBee will attempt to match the tracks you selected against the tracks on the album. Album tracks are shown in the left side of the list, including track # and length, and the original title, track length, and filename are shown on the right. Differences in the title or time will be highlighted. You can rematch tracks by drag & drop, or by using the up and down arrows next to the Settings button. You can also manually tweak any of the new filenames by slow double-clicking on it (like editing tags in the main panel).
Between the list of albums and the list of tracks are those fields which apply to the whole album. You can choose which to apply by ticking or unticking the box next to each field. If an existing value will be altered, there will be a small (!) next to the field, which you can hover over to see the original value. You can edit any of the values by hand, if needed.
You can right click on the artwork frame to access the usual Artwork Menu. Clicking on the text "artwork" will open the Artwork Search window as though you had selected "Search Internet for Picture."
When you're happy with the changes, click Apply Tags to save the new tags. If you want to add the tracks to your library as the tags are saved, also tick Add to Library (if they are already in the library, this option is disabled).

Auto-Tag Fields
- Auto-Tag Fields
The Settings button opens a window where you can untick any particular fields that you don't want MusicBee to try to download.
Auto-Tag by Track[]
Identify Track and Update Tags[]

Identify Track and Update Tags
The Identify Track and Update Tags tool works along the same lines as the Auto-Tag by Album tool, but it searches on a track-by-track basis instead of by album, and it updates tags without requiring your input on each one.
- update fields
(Default: All supported fields except artwork and lyrics) Clicking on the [...] button will open the Auto-Tag Fields selector.
- identify the track artist and title using the digital sound signature (30 secs/track)
(Default: unticked) This setting will use a 30-second sample of the track (its AcoustID) to try to identify it. When you first tick the setting, you'll get this message in a pop-up: "Identifying a track from its digital sound signature is NOT 100% accurate. It is recommended only to use this option on tracks where the artist and track title are unknown."
- update blank fields only
(Default: ticked) Unless you untick this, MusicBee will only fill in fields which are empty; it will not overwrite existing tags.
- restrict release types
(Default: unticked, album & live) Tick this to limit the types of releases that MusicBee will accept when finding tags for your files.
- retrieve multiple genres for each track to a maximum of ___ genres
(Default: unticked, 3) When unticked, one genre will be retrieved. Tick to retrieve more than one, up to a maximum number you choose.
Update Missing Artwork / Lyrics[]
Update Missing Artwork
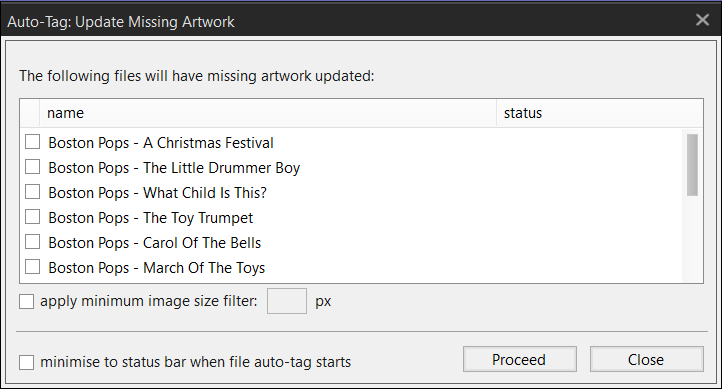
Update Missing Artwork and Update Missing Lyrics are more targeted versions of the Identify Track and Update Tags tool.
- apply minimum image size filter
(Default: unticked) For artwork, you can set a minimum size for the images MB retrieves. If you have set a minimum image size in Tags Preferences, that will be reflected here. If you change the setting here, it will also be changed in Preferences.
Update Tags Using Last.fm Tag Cloud[]


Overwrite Tags Using Last.fm Tag Cloud
As the name suggests, this tool uses the Last.fm tag cloud for each track, rather than any of the other tagging services. The tags that can be set by this tool are:
- Keywords (Default: ticked)
- Genre
- Occasion
- Mood
- Grouping
- Any two of your Custom Tags
Keywords will download all keywords found except for those in the Exceptions box. All the other fields must make a positive match with the possible values provided before a tag will be saved. Genres use the same Genre Tags list as found in Preferences. Occasions, Moods, and Groupings also have some values provided for you, but you can edit the list to your liking. For Custom Tags, you will need to provide your own list of values to be matched.
Infer and Update Tags From Filename[]
Infer and Overwrite Tags from Filename
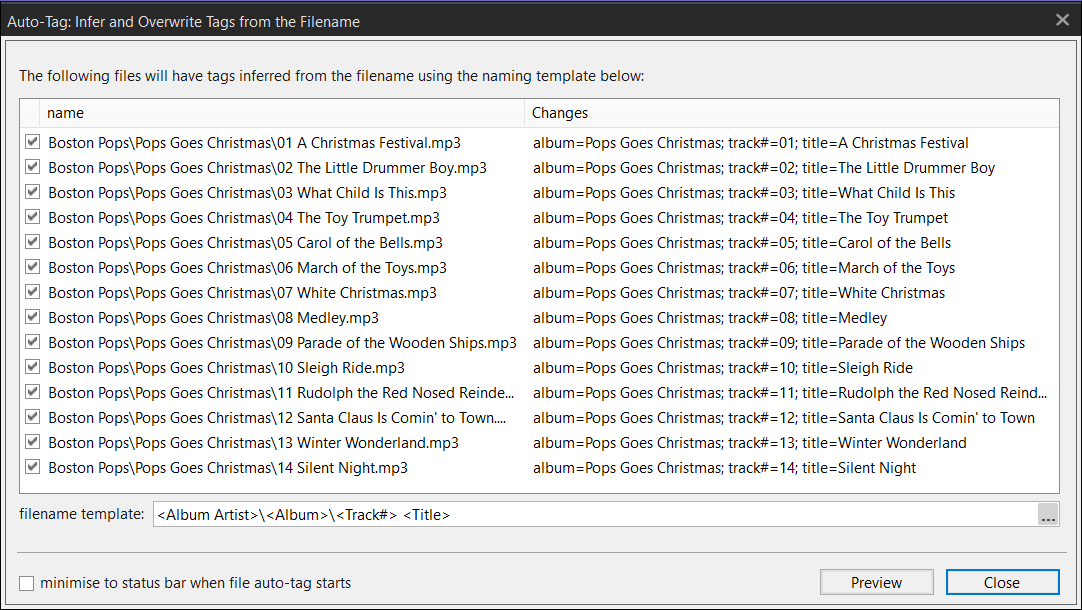
Infer and Update Tags From Filename doesn't use a web service. Instead, it attempts to fill in tags based on the folder path and filenames of tracks and a template that you provide. You can use any plain text characters, including spaces, to help MusicBee figure out how to break up the tags. Just bear in mind that it will always match the first occurrence of the character.
For an example, take a look at the image at right. The template is <Album Artist>\<Album>\<Track#> <Title>. The way MusicBee interprets the template is that any value up to the first "\" in the file path (in other words, the top level folder) is the Album Artist. For all of these files, that value is "Boston Pops". Next, any value between the first "\" and the second is the album. Again, all are the same: "Pops Goes Christmas". Then, there are no more folder levels. But notice that there is a space between Track # and Title. So MusicBee takes the value between the second "\" and the first space as the Track#. Finally, because Title is given as the last tag in the template, everything else before the file extension is assumed to be the Title.
When you use the Preview button, MusicBee will apply the template to the files you've selected and in the right hand column it will show you which tags would be changed. If the current tags match the results of the template, you will not see anything in the Changes column (in the example, the Album Artist value already matches so it is not shown). Once you have loaded the preview, you have the option to Apply Changes or Start Over.
| Tags |
|
Tagging · Tag Editor · Tag Inspector · Auto-Tagging · Tagging Tools · Artwork · Lyrics · Genres |